
Monday, September 21, 2020
Saturday, September 12, 2020
Pathfinding Diagram Improvements, Part 2
In the last post I described improving the diagrams on my Tower Defense page. Once I finished that, I moved on to my other pathfinding pages, starting with the A* page.

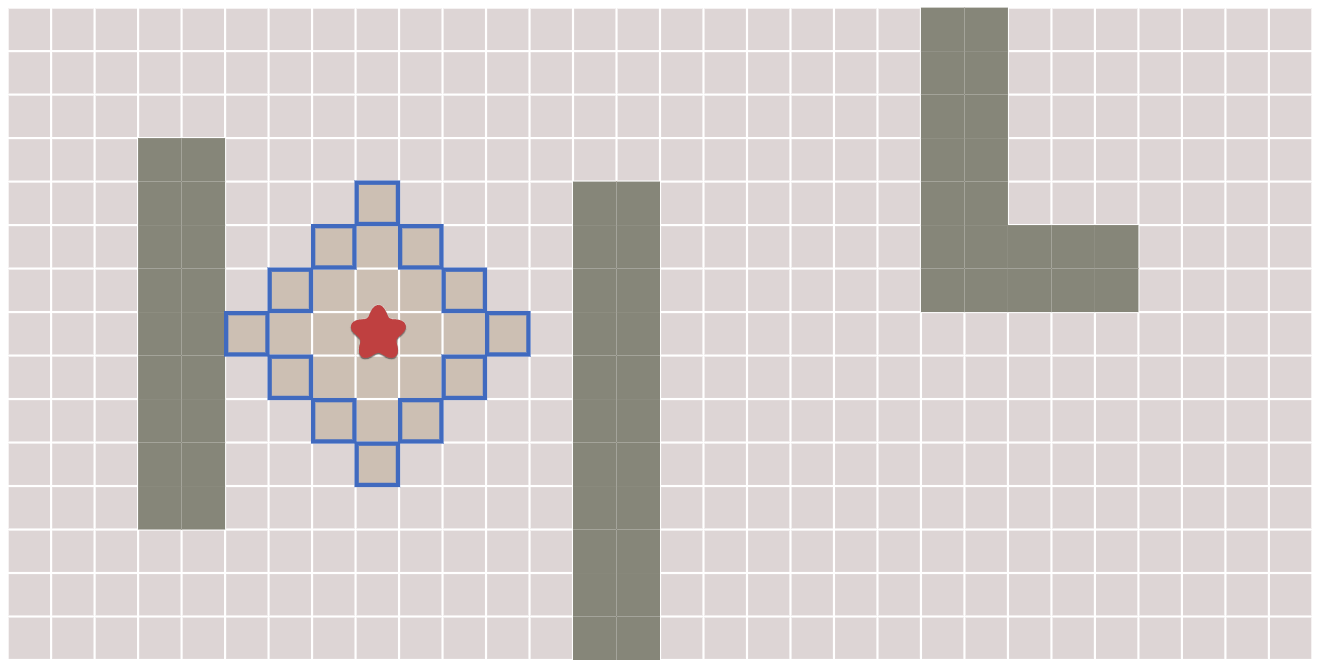
Frontier expansion diagram: I didn't find a good way to put labels on the dynamically generated diagram so I created a static state transition diagram and placed it in the text. I using inline legends, which describe in the text the shapes that I'm going to use the in the diagrams. The above is example showing some frontier nodes, unexplored nodes, and reached nodes. I also used colors that match the colors in the diagrams.
I used the inline legends to describe the state transitions:

I think it serves a separate purpose from directly showing labels on the diagram. These are meant to prepare you for the animation, whereas the labels would serve to annotate the animation.
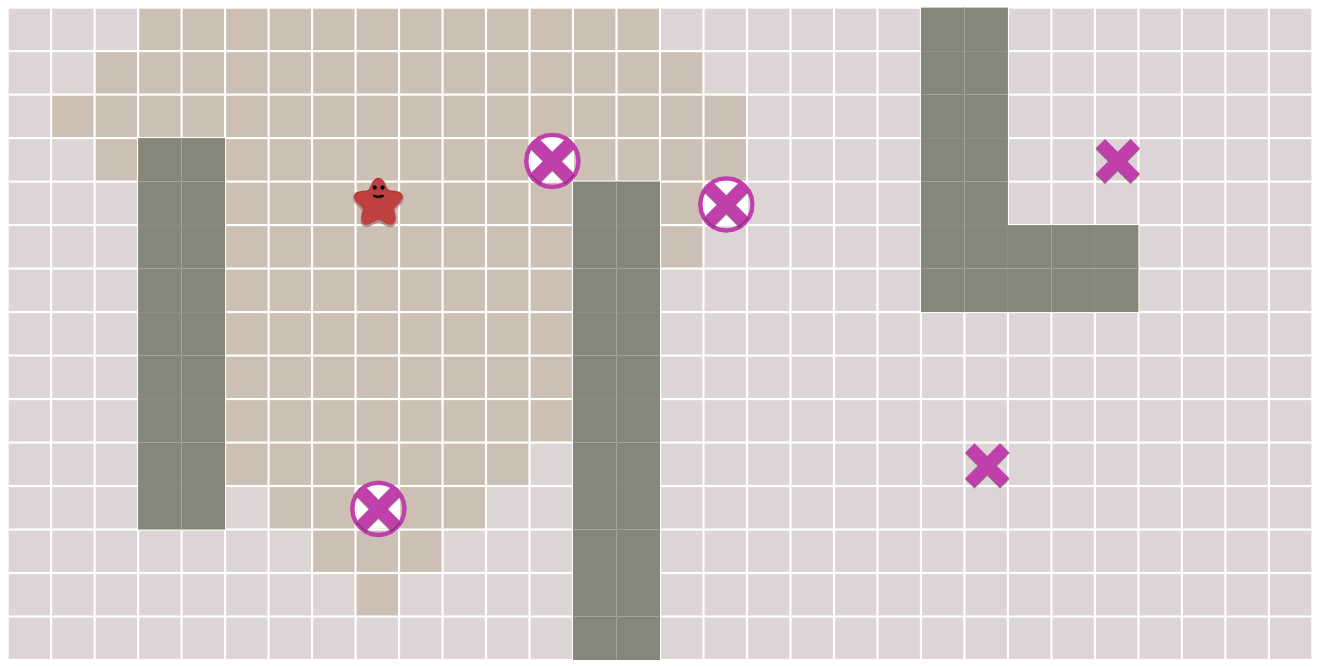
Frontier expansion diagram: I had implemented all the diagram animations to match the code. However early in the explanation, the reader hasn't seen the code yet. The frontier expansion diagram should show the concept of an expanding frontier, not the implementation of it.
I decided to change the slider from number of loop iterations to distance from start. The new animation feels smoother and easier to understand. I posted a comparison of the animations in this tweet.
Early exits: I was planning to add a few more examples of what you could do with early exits. This ended up longer than I wanted to include on the A* page, which is already pretty long, so I put it on its own Early Exit page, and linked to it from the A* page.
All pairs: This was an incomplete page from back when I was writing all the pathfinding pages. The A* page was meant to be one source one destination. The Tower Defense page was many sources one destination, or one source many destinations if run in reverse. And the All Pairs page was meant to be many sources many destinations.
I had implemented the Floyd-Warshall algorithm for all-pairs shortest paths. I had one example problem: find all pairs of paths and then see which tiles are used most often. However, it ran too slowly for this page to work well.
This is one of the struggles I have with making everything interactive. Some algorithms just won't run fast enough to demonstrate effectively.
Since I had good luck with Breadth First Search in mapgen4, with the code running at over 1 million nodes per second, I decided to try it here. Running Breadth First Search hundreds of times was far faster than I expected. The calculation time went from 400ms to 14ms!! It now runs at interactive speeds!

Now that I'm no longer blocked by the algorithm performance, I want to work on this page. Try the first diagram and let me know if you have ideas for more diagrams to add.
Miscellaneous improvements: Lots of my experiments didn't work out, but I kept a few:
- I changed most of the sliders to use a dynamic range. Ideally the slider minimum should be 0 and the maximum should be the last time when something changes on the diagram. The problem is that I implemented the search algorithms to exit early. That means I don't know the last time when something might change. Fortunately for most diagrams I can calculate this in a different way. There's one diagram where I can't easily calculate it without running search twice, once without early exit and once with, so I didn't implement the dynamic range there.
 I've long wanted to add faces to my blobs. I've been experimenting with procedurally generated cartoon faces since 2011 or maybe earlier. In my most recent experiment from 2018, I got the mouth working nicely, and I used that in 2019 to regenerate my blob logo. I still haven't worked on the eyes though. I'd like to make blinking attentive eyes. I decided I should put static faces in now instead of waiting until I have everything working.
- One reason I generally use SVG instead of Canvas is that many effects are much easier to implement. One of those is cursor feedback. I can update a tiny part of the SVG, and the browser will figure out what to redraw. Sometimes I don't even need an event handler, such as when I use CSS :hover to add a drop shadow. When I rewrote these diagrams into Canvas, I lost the visual feedback, so I went back and implemented a visual feedback system in code instead of in SVG+CSS. It's a lot more work in Canvas but for this page it was worth it.
The new diagram class has been a joy to work with. It has so much easier to work on diagrams than with my old code. The old diagram class was premature abstraction. I wrote it and then wrote the diagrams to fit the abstration. The new diagram class is based on my experience making the diagrams. The abstraction fits the needs of the project.

Friday, September 4, 2020
Staying Busy During These Times
The world is crazy right now. COVID, civil injustice and the unrest that follows.
My work has kept me busy, and there've been some household changes with the grandkids going back to their parents for the summer. That impacted the gaming routine.
I did have two successful seminars at the recent Con of Champions for Tabletop Events, as well as running my Heist game and Delve the Deeps game. Both were interesting and everyone seemed to enjoy themselves.
More recently, I've taken to streaming my podcast recordings! I try to do that every two weeks and the next session is this Thursday at 7pm. I'm going to finish up talking about Unearthed Arcana's classes and get into some miscellanea before getting to spells! You can join me here: https://twitch.tv/chgowiz
I've also found myself in a very fun self-improvement project - learning Python by recreating the very first dungeon crawler I ever played. Did you know that there is a graphical/top-down dungeon crawler that predates unix's rouge?
Yep, the program DUNGEON from Cursor Magazine (issue #15) for the Commodore PET. I played this game in 1979 or 1980 and I was hooked.
Right now, the game is very basic, but I'm getting there! You can follow along to some degree on this r/commodore thread on reddit, or see the code as I update it on my github repository here: https://github.com/Chgowiz/PyDungeon/


My version is on the left - a completed game of DUNGEON from a PET emulator on the right.
Funny coda, after 40 years, I finally finished the game and won! I collected all the gold. I guess knowing the source and how the game works was a huge help. That's something my 13 year old self would have liked to have known... damn wyverns!
I hope that you all are well, safe and hanging in there.
My work has kept me busy, and there've been some household changes with the grandkids going back to their parents for the summer. That impacted the gaming routine.
I did have two successful seminars at the recent Con of Champions for Tabletop Events, as well as running my Heist game and Delve the Deeps game. Both were interesting and everyone seemed to enjoy themselves.
More recently, I've taken to streaming my podcast recordings! I try to do that every two weeks and the next session is this Thursday at 7pm. I'm going to finish up talking about Unearthed Arcana's classes and get into some miscellanea before getting to spells! You can join me here: https://twitch.tv/chgowiz
I've also found myself in a very fun self-improvement project - learning Python by recreating the very first dungeon crawler I ever played. Did you know that there is a graphical/top-down dungeon crawler that predates unix's rouge?
Yep, the program DUNGEON from Cursor Magazine (issue #15) for the Commodore PET. I played this game in 1979 or 1980 and I was hooked.
Right now, the game is very basic, but I'm getting there! You can follow along to some degree on this r/commodore thread on reddit, or see the code as I update it on my github repository here: https://github.com/Chgowiz/PyDungeon/
My version is on the left - a completed game of DUNGEON from a PET emulator on the right.
Funny coda, after 40 years, I finally finished the game and won! I collected all the gold. I guess knowing the source and how the game works was a huge help. That's something my 13 year old self would have liked to have known... damn wyverns!
I hope that you all are well, safe and hanging in there.
Sunday, August 30, 2020
Osueta: A Simple Python Script To Exploit The OpenSSH User Enumeration Timing Attack

About Osueta?
Osueta it's a simple Python 2 script to exploit the OpenSSH User Enumeration Timing Attack, present in OpenSSH versions <= 7.2 and >= 5.*. The script has the ability to make variations of the username employed in the bruteforce attack, and the possibility to establish a DoS condition in the OpenSSH server.
Read more: OpenSSH User Enumeration Time-Based Attack
The bug was corrected in OpenSSH version 7.3.
Authors of Osueta:
- c0r3dump3d: coredump@autistici.org
- rofen: rofen@gmx.de
Osueta's Installation
For Linux users, open your Terminal and enter these commands:
If you're Windows users, follow these steps:
- Install Python 2.7.x from Python.org first. On Install Python 2.7.x Setup, choose Add python.exe to Path.
- Download Osueta-master zip file.
- Then unzip it.
- Open CMD or PowerShell window at the Osueta folder you have just unzipped and enter these commands:
pip install python-nmap paramiko IPypython osueta.py -h
Advice: Like others offensive tools, the authors disclaims all responsibility in the use of this script.
Osueta help menu:

Osueta's examples:
A single user enumeration attempt with username variations:
python2 osueta.py -H 192.168.1.6 -p 22 -U root -d 30 -v yesA single user enumeration attempt with no user variations a DoS attack:
python2 osueta.py -H 192.168.1.6 -p 22 -U root -d 30 -v no --dos yesScanning a C class network with only one user:
python2 osueta.py -H 192.168.1.0/24 -p 22 -U root -v no Scanning a C class network with usernames from a file, delay time 15 seconds and a password of 50000 characters:
python2 osueta.py -H 192.168.1.0/24 -p 22 -L usernames.txt -v yes -d 15 -l 50More info
- Hacker Tools Linux
- Android Hack Tools Github
- Kik Hack Tools
- New Hacker Tools
- Hacking Tools Name
- Hacker Tools For Ios
- Pentest Box Tools Download
- Pentest Tools Alternative
- Hacker Tools For Mac
- What Are Hacking Tools
- Hacker Tools Free Download
- Hacker Tool Kit
- Pentest Tools Online
- Hacking App
- Pentest Tools Nmap
- Hacker Tool Kit
- Hacker Tools List
- Hack App
- Pentest Tools Find Subdomains
- Hacking Tools Windows
- Pentest Tools Kali Linux
- Pentest Reporting Tools
- Hacking Tools For Windows
- Pentest Tools Open Source
- World No 1 Hacker Software
- Hack Tools For Mac
- Pentest Tools Windows
- Hacker Tools 2020
- Pentest Box Tools Download
- Pentest Box Tools Download
- Tools 4 Hack
- Hacking Tools Online
- Hacker Tools Windows
- Bluetooth Hacking Tools Kali
- Hack Tools Mac
- Hacking App
- Github Hacking Tools
- Hacking Tools Pc
- Hacker Tools Windows
- New Hack Tools
- Pentest Tools Subdomain
- Termux Hacking Tools 2019
- Pentest Tools Nmap
- Hacks And Tools
- Hacker Search Tools
- Hacking Tools For Windows 7
- Hacker Tools 2019
- Nsa Hack Tools Download
- Black Hat Hacker Tools
- Hack Website Online Tool
- Hak5 Tools
- Physical Pentest Tools
- Hacker Tools List
- What Is Hacking Tools
- Pentest Tools Port Scanner
- Best Pentesting Tools 2018
- Hacker Tools For Windows
- Hak5 Tools
- Easy Hack Tools
- Bluetooth Hacking Tools Kali
- Pentest Tools For Android
- Hacking App
- Easy Hack Tools
- Pentest Tools Port Scanner
- Hacking Tools Windows
- Wifi Hacker Tools For Windows
- Hacks And Tools
- Hacking Tools For Windows
- Pentest Tools Windows
- Hack Tools Mac
- Pentest Tools Windows
- Android Hack Tools Github
- Hacking Tools For Pc
- Hacker Tools Mac
- Hacker Tools For Mac
- Black Hat Hacker Tools
- Pentest Tools Website Vulnerability
- Pentest Tools Bluekeep
- Hacking Tools Mac
Memcrashed DDoS Exploit | Install | Github
Related news
- Hacking Tools Github
- Termux Hacking Tools 2019
- Pentest Tools
- Hacking App
- Easy Hack Tools
- Hacker Tools Linux
- Ethical Hacker Tools
- Computer Hacker
- Hacker Tools For Ios
- Hacking Tools Mac
- Hack Rom Tools
- Hacker Tools Mac
- Hack Tools For Games
- Hack Tools Github
- Pentest Tools Subdomain
- Pentest Tools Free
- Hacker Tools 2019
- Hackers Toolbox
- Pentest Tools Website Vulnerability
- Pentest Tools Review
- Pentest Tools For Ubuntu
- How To Hack
- Easy Hack Tools
- Physical Pentest Tools
- Hack Tools For Ubuntu
- Hacker
- Hacking Tools Software
- Hacker Tools 2020
- Android Hack Tools Github
- Beginner Hacker Tools
- Hacking Tools Usb
- Pentest Tools Port Scanner
- Computer Hacker
- Pentest Tools For Ubuntu
- Hacking Tools Pc
- Tools Used For Hacking
- Hacker Tools 2019
- Hacking Tools Github
- Tools For Hacker
- Hacker Tools Apk
- Hacking Tools Usb
- Hacking Tools For Kali Linux
- New Hacker Tools
- Pentest Tools For Windows
- Hack And Tools
- Blackhat Hacker Tools
- Hacking Tools Online
- Hacker Tools Windows
- Pentest Tools Nmap
- World No 1 Hacker Software
- Pentest Tools List
- Hacker Tools Free Download
- Hacking App
- How To Hack
- Hacker Tools Windows
- Pentest Tools Online
- Pentest Tools Online
- Hacking Tools Hardware
- Pentest Tools
- Hacking Tools For Mac
- Easy Hack Tools
- Hack App
- Hack Tools For Windows
- Pentest Tools Nmap
Evil Limiter: Taking Control Of Your Network Bandwidth

Ever wanted to block someone from the network or limit their bandwidth without having the network admin privileges? Well Evil Limiter has got you covered then.
An amazing tool to help you control your network without having access to the admin panel.
Today I'm gonna show you how to use this interesting tool to take control of your network.
Requirements:
1. A PC or Laptop with Linux OS.2. A Network Adapter.
3. Access to the Network you want to control.
4. sudo or root access on your Linux OS.
First of all we will download the tool from its github repository:
https://github.com/bitbrute/evillimiter
You can download and extract the zip file from the link above or you can clone evillimiter repository using git like this:
git clone https://github.com/bitbrute/evillimiter
Now lets install the downloaded tool on our machine
Step 1: Move inside the downloaded github repository
cd evillimiter
Step 2: To install type
sudo python3 setup.py install
wait for the installation to finish (May take some time)
Step 3: To run type
sudo evilimiter
Voila! That's it, you got it up and running on your machine
Now how do you control your network with it, its very easy.
It should detect your network automatically but yeah you can set it up manually as well using the command line argument -i.
After you have selected the right interface to control, you need to scan your network for live hosts. To perform the scan type
scan
you can pass an optional flag to the scan command which is range which will help you to specify the range of ip addresses you want to scan like this
scan --range 192.168.1.1-192.168.1.100

The above command will scan a total of 100 hosts from 192.168.1.1 to 192.168.1.100
Now after you have scanned your network next thing is to list the hosts that have been discovered during the scan for that you type the hosts command like this
hosts

Now you know the hosts on your network and now you should know which host you wanna block or limit based on the mac address of the host. Remember the host id of the host that you want to block or limit bandwidth of and lets do the magic.
to block a host from using the internet we simply specify the block command followed by the host id of the host that we want to block like this
block 1

if instead of blocking the host we just want to limit his internet bandwidth we can do just that by using the limit command followed by the host id and then the bandwidth that we want to allocate to that particular host like this
limit 1 100kbits

Wohooo! yeah its that easy and yes you can do all this without having the network admin role.
Now if you want to show mercy on that poor guy (blocked host), you can set him free by using the free command followed by the host id like this:
free 1

Well isn't administrating your network bandwidth so easy now.
Hope you enjoyed this tutorial.:)
- Beginner Hacker Tools
- What Is Hacking Tools
- Best Pentesting Tools 2018
- Kik Hack Tools
- Underground Hacker Sites
- Hacker Tool Kit
- How To Make Hacking Tools
- Hacker Tools Free
- Hacking Tools And Software
- Hacker Tools Free Download
- Pentest Tools Download
- Hack Tools 2019
- Pentest Tools Find Subdomains
- Hacker Tools For Pc
- Github Hacking Tools
- Hacking Tools Windows
- Pentest Tools For Ubuntu
- Underground Hacker Sites
- How To Make Hacking Tools
- Hack Tool Apk No Root
- Pentest Box Tools Download
- Pentest Recon Tools
- Hacker Tools For Mac
- Hack Tools For Games
- Hackrf Tools
- Blackhat Hacker Tools
- Hacker Security Tools
- Hacking Tools Hardware
- Pentest Tools Framework
- How To Make Hacking Tools
- Pentest Automation Tools
- Hacking Tools For Mac
- Usb Pentest Tools
- Hacker Tools For Windows
- Pentest Tools Bluekeep
- Hacking Tools Github
- Tools Used For Hacking
- Hack Tools Github
- Hacker Tools Free Download
- Bluetooth Hacking Tools Kali
- Pentest Tools Nmap
- Hacking Tools For Windows 7
- Pentest Tools Free
- Hack Tools
- Hacker Tools For Mac
- Hacker Tools Windows
- Nsa Hacker Tools
- Pentest Tools Bluekeep
- Hacking Tools Mac
- Hacker Hardware Tools
- Pentest Tools Find Subdomains
- Hacker Tools Online
- Pentest Tools Find Subdomains
- Hack Tools For Windows
- Pentest Tools Online
- Pentest Tools For Ubuntu
- New Hacker Tools
- Blackhat Hacker Tools
- Pentest Tools Linux
- Ethical Hacker Tools
- Pentest Tools Android
- Hack Tools
- Hacking Tools Windows
- Hack Tools For Ubuntu
- Hacking Tools Usb
- Top Pentest Tools
- Pentest Tools Website Vulnerability
- Blackhat Hacker Tools
- Hacker Tools For Windows
- Pentest Tools Url Fuzzer
- Hack Website Online Tool
- Hacker Tools 2020
- Hacking Tools Windows
- Hacker Tools Online
- Pentest Tools Find Subdomains
- Hacking Tools Download
- Hak5 Tools
- Hacker Tools For Windows
- Hacking Tools Usb
- Hack Tools
- Hack Tools For Games
- Usb Pentest Tools
- Usb Pentest Tools
- Tools Used For Hacking
- Hack Tools 2019
- Hack Tools For Pc
- Hackrf Tools
- Hack Tools 2019
- Hack Tool Apk
- Hacking Tools Download
- Hack Tools Download
- Hacker Tools Linux
- Underground Hacker Sites
- Ethical Hacker Tools
- Pentest Tools Kali Linux
- Kik Hack Tools
- Kik Hack Tools
- Pentest Tools Subdomain
- Hack Tools Online
- Hack Apps
- Pentest Tools Open Source
- Hacking Tools Name
- Hacking Tools Online
- Hacker Tools Hardware
- Game Hacking
- Free Pentest Tools For Windows
- Ethical Hacker Tools
- Hacker Tools For Ios
- Best Hacking Tools 2020
- Hacker Tools For Mac
- Hacker Tools Software
- Hacker Tools Windows
- Hack Tool Apk No Root
- Hack Tools For Ubuntu
- Pentest Tools For Ubuntu
- Pentest Tools Find Subdomains
- Hack Tools Pc
- Hacker Tools Windows
- Beginner Hacker Tools
- Hacker Tools For Mac
- Tools Used For Hacking
- How To Hack
- Hacking Tools Mac
- Pentest Box Tools Download
- Hacker Techniques Tools And Incident Handling
- Pentest Tools Online
- Hack Tools
- Hacking Tools For Kali Linux
- Hacking Apps
- Pentest Tools Bluekeep
- Hack Tool Apk No Root
- Pentest Tools Kali Linux
- Hack And Tools
- Wifi Hacker Tools For Windows
- How To Hack
- Hacking Tools Hardware
- Hacking Apps
- Pentest Tools Url Fuzzer
- Pentest Tools Tcp Port Scanner
- Hacking Tools Free Download
- Pentest Tools Url Fuzzer
Subscribe to:
Posts (Atom)